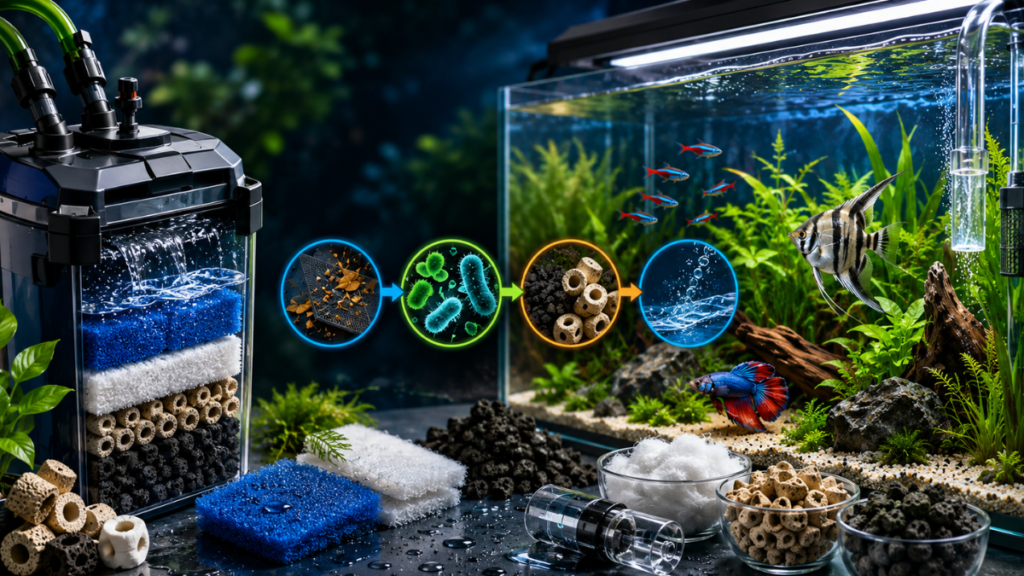
Feels like the water in your fancy aquarium is a chaotic mess? Here’s the definitive guide to aquarium filtration. My own experience, practical secrets, maintenance tricks, and the exact setup that gets you crystal-clear, healthy water today.
Let’s untangle the mystery of your tank’s beating heart together: the filtration system. Forget the dry technical manuals stuffed with jargon nobody understands. We’re breaking down every type of filtration, every media, and every trick, so by the time you finish reading, you’ll know exactly what your ecosystem needs to shine. Ready for the ride? Let’s go.
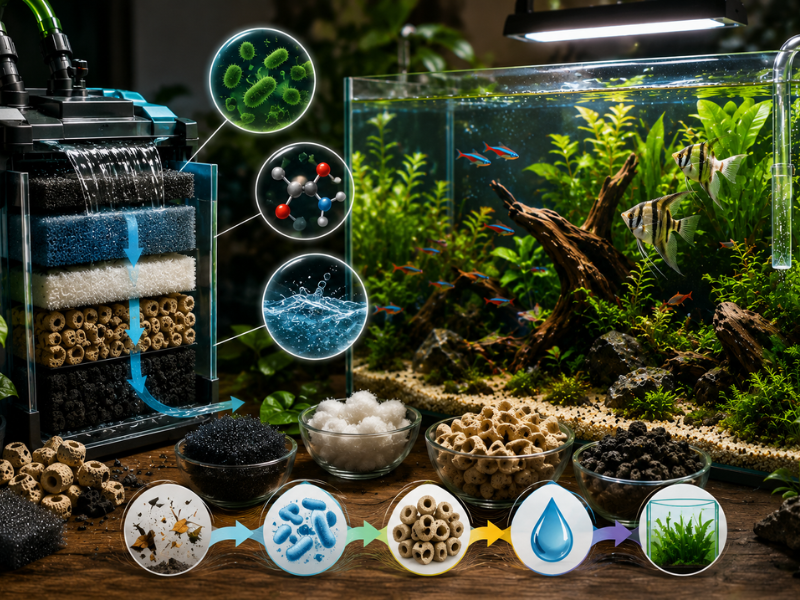
Images in this post were designed with AI assistance for illustration only
This post contains affiliate links. If you buy through them you’re supporting my work at no extra cost to you
The quick-reference table of aquarium filtration
| Type / element | What it does | Upside | Downside | Best for |
|---|---|---|---|---|
| Mechanical filtration | Traps visible debris and particles | Clearer water, protects the bio media | Needs regular cleaning | Every tank |
| Biological filtration | Turns ammonia and nitrite into nitrate | Keeps the ecosystem stable | Sensitive to chlorine and aggressive cleaning | Non-negotiable in any tank |
| Chemical filtration | Removes dissolved substances and meds | Excellent after treatments and for algae control | Not meant for continuous use | Specific situations |
| Internal filter | Basic filtration inside the tank | Cheap and easy to install | Very little room for bio media | Small tanks (under 15 gal) |
| Hang-on-back filter | External filter clipped onto the glass | Clean look, convenient, quiet | Can get noisy if the water level drops | Mid-sized and planted tanks |
| Canister filter | Powerful, high-capacity external unit | Great performance and clean look | Pricier and more complex | Large tanks (40 gal and up) |
| Sponge filter | Gentle filtration and aeration | Safe for shrimp and fry | Weak fine filtration | Shrimp tanks and breeding setups |
| Undergravel filter | Pulls water through the substrate | Huge biological surface area | A pain to maintain | Older setups or niche builds |
| Sump system | Pro-level, high-volume filtration | Maximum stability, hides all the gear | Complex and expensive to install | Reef tanks and big freshwater builds |
| Coarse sponge | First mechanical barrier | Catches large debris | Clogs quickly | First stage of the filter |
| Filter floss | Fine mechanical filtration | Crystal-clear water | Needs replacing often | Final polishing step |
| Ceramic rings | Home for beneficial bacteria | Strong biological filtration | Needs gentle rinsing only | HOB and canister filters |
| Activated carbon | Adsorbs chemicals and medications | Very effective short-term | Also strips useful nutrients | Post-treatment cleanup |
| Proper maintenance | Preserves the beneficial bacteria | Prevents ammonia spikes | Takes a routine and some care | Every tank |
| The worst mistake | Rinsing bio media under tap water | — | Kills the nitrifying bacteria | Always avoid |
| The key habit | Keeping the filter running 24/7 | Constant biological stability | — | Fundamental in fishkeeping |
| Live plants | Consume nitrates and oxygenate | Support natural balance | Need basic care | Planted tanks |
Why the filter isn’t an accessory. It’s the lungs of your tiny ocean
Picture yourself locked in a gorgeous room. Beautifully decorated, every luxury you can think of, but nobody opens the windows or freshens the air for months. Comfortable at first, unbearable in short order. Right? That’s exactly what your fish go through when you pick the wrong filter or slack on the maintenance.
Plenty of people getting into this hobby assume the filter is there to catch fish poop and dead plant bits. Big mistake. That’s the tip of the iceberg. The filter is a living biochemical reactor, an invisible ecosystem inside the visible one, and its real job is turning highly toxic substances into things that either get absorbed or become harmless. It’s the engine, the lungs, and the kidneys of your tank rolled into one appliance.
Once that clicks, fishkeeping changes for you. You stop seeing a noisy box shoved in the corner and start seeing a quiet ally that runs 24/7 so your little companions can swim happy, show off their best colors, and live for years.
The three pillars of aquarium filtration
Before we can talk about the different filters on the shelves, we need to talk about what’s happening inside them. It doesn’t matter whether you own a tiny hang-on-back or a massive sump for a 250-gallon tank. All of them rely on three processes working in sync.
Mechanical filtration: the first line of defense
Mechanical is the most intuitive of the three. You’re literally trapping the particles suspended in the water. Uneaten food, visible waste, bits of plant matter shedding off, and that fine dust that clouds the water column sometimes.
The goal here isn’t only for the water to look clear (though that’s a nice bonus). It’s also to protect the later stages of the filter. If you don’t catch the big stuff at the beginning, it travels straight into the biological media, clogs the pores, and smothers the bacteria you’ve worked so hard to grow. Water always, always passes through mechanical filtration first.
The go-to material here is sponge foam in different densities. There’s also filter floss, that soft white synthetic wool. Filter floss is magic for the final water polish, catching the smallest particles that slip past everything else, but it saturates fast and needs replacing often.
Biological filtration: where the real magic happens
If you ask me what the heart of a tank is, I’ll say biological filtration without missing a beat. This is where physics steps aside and something closer to magic takes over. You’re not catching visible debris here. You’re housing billions of beneficial bacteria (mainly Nitrosomonas and Nitrobacter) that run the nitrogen cycle.
Fish breathe, pee, and poop. Organic matter breaks down. All of that produces ammonia, which is extremely toxic and can kill fish in a matter of hours. Enter our microscopic heroes. The first group converts ammonia into nitrite (still very dangerous). The second converts nitrite into nitrate, which is far less harmful and gets used as fertilizer by live plants.
For these bacteria to thrive and form stable colonies, they need a comfortable house. That house is porous biological media: ceramic rings, sintered glass, treated pumice, or the newer plastic matrix products. The more porous the material, the more usable surface area you get in less space, which means more bacteria and better protection against toxicity spikes.
Chemical filtration: the emergency tool for special situations
Then there’s chemical filtration. Unlike the other two, this one shouldn’t be running continuously in a balanced, mature tank. Chemical filtration uses materials that change the water’s properties through absorption, adsorption, or ion exchange.
When do we actually reach for it? Very specific moments. If you had to medicate your fish, once the treatment’s over you need to strip the leftover medication out of the water so it stops stressing the system. That’s where activated carbon, the king of chemical filtration, walks in. A few days and the water is clean of chemicals.
There are also resins for pulling out phosphates, silicates, or nitrates when an algae outbreak gets out of hand, or peat for lowering pH and tinting the water with tannins if you’re recreating an Amazon river biotope. It’s a fantastic toolkit, but you need to know exactly why you’re using it before you drop it in the filter.
Every filter on the market, from best to worst fit for your setup
Now that you get how the water flow works inside a filter, it’s time to hit the store (or browse online) and actually pick the physical box that’s going to do all the dirty work for you.
There are so many options it’s easy to feel overwhelmed. No worries. Let’s go through them one at a time, the good, the bad, and who each one is really made for.
1. Internal filters: simple and practical when space is tight
Internal filters are the classic ones you stick to the inside glass with suction cups. Usually the ones that come free in the starter kit everyone buys their first time around.
The mechanism is basic. A small submersible pump draws water in through the bottom, pushes it through a cartridge (typically a sponge and a little activated carbon), and shoots it out the top, moving the surface as it goes.
The upsides
- Cheap and available literally everywhere.
- Installation is as easy as sticking it to the glass and plugging it in.
- Uses almost no electricity.
- Zero risk of water leaks outside the tank, since everything’s submerged.
The downsides
- Steals precious real estate inside the tank, cutting into swimming room.
- Not pretty, and hard to hide behind plants or rocks.
- Extremely limited capacity for biological media.
- Cleaning means sticking your hands in the tank, which always stresses out whoever’s living in there.
Who should buy one?
I mainly recommend these for small tanks, under 15 gallons or so, with a light bioload (a few small fish). They’re also great as a supplemental filter in a large tank, breaking up dead spots, or in quarantine and hospital tanks where you want something fast and uncomplicated.
2. Hang-on-back filters: the clean-looking option that clips right onto the glass
I’ve got a soft spot for these. Hang-on-back filters (HOBs) clip onto the top edge of the back glass. The pump stays outside (or submerged via an intake tube), pulls water up from the tank, runs it through media compartments outside the tank, and returns it as a soft waterfall.
It’s a beautiful option for anyone who wants to graduate from an internal filter without dropping a fortune or fussing with hoses and stands.
The upsides
- Doesn’t take up space inside the tank, so more room for aquascape and fish.
- Great-looking, and the waterfall return is genuinely relaxing while also oxygenating the water beautifully.
- Wonderfully easy to clean: open the top from outside, pull the trays, done, no getting wet.
- Decent media capacity if you know how to load it right.
The downsides
- Needs an open-top tank or a lid with a cutout to hang from.
- If the water level drops from evaporation, the waterfall gets loud and splashy.
- Not compatible with tanks that have thick plastic rims that block the hanging bracket.
Who should buy one?
Undisputed kings of mid-sized tanks, roughly 10 to 30 gallons. Ideal for planted tanks, shrimp tanks (put a pre-filter sponge on the intake so it doesn’t vacuum up babies), and anyone who values easy weekly maintenance.
3. Canister filters: the workhorse for bigger builds
If you’re getting serious about the hobby or planning anything over 25 gallons, a canister filter is your best friend. These are sealed high-capacity cans that usually hide inside the stand under the tank. Two hoses connect the can to the tank: one pulls dirty water down, the other sends clean water back up.
We’re playing in the big leagues here. The volume of media a canister can hold is jaw-dropping compared to anything above.
The upsides
- Huge capacity for biological, mechanical, and chemical media all at once.
- Extremely clean look: inside the tank you only see two discreet tubes (which can be clear glass lily pipes to disappear almost entirely).
- Whisper-quiet when you buy a good brand and prime it properly.
- Flow rate strong enough to move water through every corner of the tank.
- Long intervals between cleanings. You can go months without opening it.
The downsides
- Meaningfully more expensive than internals or HOBs.
- Initial setup takes some patience with routing the hoses and priming the system so no air stays trapped inside.
- There’s a small risk (low if you install it correctly) of a leak on your living room floor if a gasket fails or a hose comes loose.
Who should buy one?
Basically mandatory for large tanks, 40 gallons and up. Also the preferred pick for aquascaping enthusiasts and anyone keeping big or messy fish, like discus, African cichlids, or those adorable-but-filthy goldfish, all of which need pristine water quality and constant flow.
4. Sponge filters: the go-to for breeders and shrimp lovers
Simplest filter on Earth, and unbeatable in the right context. It runs off an external air pump. Air travels down a tube to the bottom of the filter, then rises as bubbles, dragging water along with it and forcing it through a dense sponge sitting right inside the tank.
No space-age tech, no modern design. Just elementary physics doing what it does.
The upsides
- Ridiculously cheap to buy and to run.
- Fantastic biological filtration, since the entire outer surface of the sponge gets colonized by bacteria.
- 100 percent safe for newborn fry and small shrimp. There’s no impeller and no violent suction to hurt them.
- Oxygenates the water like nothing else thanks to the constant bubble stream.
The downsides
- Visually chunky, and honestly not attractive inside the tank.
- Fine mechanical filtration is weak. Don’t expect crystal-clear, particle-free water if you keep big fish that stir up the bottom.
- The hum of the air pump and the constant bubbling can drive you nuts if the tank is in your bedroom or somewhere you need silence.
Who should buy one?
The clear favorite for fry-rearing tanks, dedicated shrimp tanks, and betta tanks, since bettas hate the strong currents other filters throw at them.
5. Undergravel filters: an old-school setup that fell out of favor
Can’t do a full roundup without mentioning the grandfather of filters: the undergravel. If you had a tank 20 or 30 years ago, you know exactly what I’m talking about. Plastic grid plates go under the substrate covering the whole floor. Vertical uplift tubes with an air pump or powerhead force water down through the gravel, using the gravel itself as mechanical and biological media.
Revolutionary in its day, mostly forgotten now, and for good reasons.
The upsides
- Turns the entire tank floor into one giant biological filter bed.
- Water circulates through plant roots, delivering nutrients in theory.
The downsides
- Over time, heavy waste piles up under the plates and there’s physically no way to clean it out without tearing the whole tank down.
- If the substrate compacts or plant roots take over, dead zones form with no oxygen, and dangerous anaerobic bacteria move in. Those can rot roots and release toxic gases.
- Not compatible with fine nutrient substrates or silica sand, which fall through the slots and clog the whole thing.
Who should buy one?
Honestly, almost nobody recommends these anymore outside of very specific old-school builds or experienced hobbyists who’ve perfected periodic deep vacuuming. For the average keeper, there are far better and safer options on the market today.
6. Sump systems: the top of the mountain for demanding builds
We reach the crown jewel: the sump. This isn’t something you buy in a box. It’s a custom-built system. You put a second glass tank divided by baffles into compartments right under the display tank, inside the stand. Water flows from the display down into the sump by gravity via an overflow, runs through the compartments packed with all kinds of media, and a powerful return pump sends the clean water back up.
Standard, almost mandatory in reef keeping, and increasingly popular in big freshwater tanks.
The upsides
- Massive filtration volume, sometimes a third or half the size of the display tank.
- Lets you hide every piece of gear out of sight: heaters, temperature probes, auto top-off, CO2 reactors. In the display tank you see water, fish, and plants. Nothing else.
- Substantially increases the total water volume of the system, which translates to way more parameter stability when anything unexpected happens.
- Maintenance is comfortable because you work at a nice height inside the stand, with full independent access to each compartment.
The downsides
- Requires drilling holes in the display tank or fitting a specific external overflow for the downflow.
- The cost of installation, PVC plumbing, valves, and return pump adds up quickly.
- Needs careful upfront design to calculate water volumes during a power outage, or you’re looking at a disastrous flood in your house.
Who should buy one?
For saltwater tanks, big freshwater setups (75 to 100 gallons and up), and advanced keepers chasing absolute stability plus that clean look with no gear cluttering the display.
How to load the inside of your filter so it actually works
Great, you picked the right filter for your project. Now here comes the mistake I watch people make constantly at the store: they open the box, leave the cartridges exactly as they came from the factory, and plug it in. Hold on. Manufacturers often set up filters expecting you to keep buying replacement cartridges forever, packing them with activated carbon or overly thick sponges that waste the usable space.
Let’s learn to load our filter media like a pro. The golden rule: always follow the direction of the water flow. Doesn’t matter whether your filter moves water bottom to top, back to front, or left to right. The order absolutely matters here.
The sacred order of filter media
- Stage 1: coarse mechanical filtration. Dirty water comes in straight from the tank loaded with leaves, food scraps, and waste. The first thing it should hit is a coarse sponge (large-pore foam). This sponge catches the big stuff without clogging in two days.
- Stage 2: fine mechanical filtration. Right after the coarse sponge, add a layer of fine-pore foam or a pad of filter floss. This catches the tiny particles that snuck past. By the time water leaves this stage, it should look visibly clean.
- Stage 3: heavy biological filtration. Now that the water is free of solids that could clog pores, it’s time for the biological media. Pack in as much high-quality sintered glass or porous matrix media as you can fit. This compartment should take up at least 60 to 70 percent of the filter’s total space. More is better, always.
- Stage 4: chemical or spare. In the final stretch, right before the pump sends the water back up, leave a small open space. This is where you’d put activated carbon if you’re stripping out medication, or resins if you’re fighting a runaway parameter. If you don’t need chemical filtration right now (which is the norm), fill the gap with more biological media or another clean layer of filter floss.
The art of maintenance: cleaning the filter without killing everything inside it
This is where the real drama of fishkeeping plays out. Your filter’s humming along, the water looks gorgeous, and suddenly the outflow slows down a bit. Cleaning time. You take it to the bathroom, open it, get a whiff of that damp-earth smell, and commit the cardinal sin that ruins entire tanks every single day: rinsing the media under tap water.
Why is it fatal? Because tap water contains chlorine and chloramine. Those chemicals are added on purpose to disinfect and kill bacteria that could harm humans. Problem is, chlorine doesn’t tell the difference between bad bacteria and your precious nitrifying colony inside the filter. Rinse your bio media under chlorinated tap water and you’ve just committed mass bactericide.
You’ve wiped out the nitrogen cycle in one shot, and your tank will crash into a lethal ammonia spike within days.
The correct cleaning protocol, step by step
- Step 1: unplug the filter for safety before touching anything.
- Step 2: during your weekly water change, take out a bucket of water straight from the tank. That water’s already dechlorinated and at the right temperature.
- Step 3: open the filter and pull out the mechanical media (sponges). Rinse and squeeze them out inside that bucket to release all the brown gunk. If the filter floss is black and falling apart, just toss it and replace with a fresh piece.
- Step 4: take out the biological media (ceramic rings or porous substrates) and swish them gently in the same bucket. Don’t scrub like you’re doing dishes. Just a few soft swirls to knock loose the surface gunk clogging the pores, keeping the precious living bacterial film intact.
- Step 5: wipe down the interior plastic walls of the filter and check the magnetic impeller for algae strands or snails jamming the blades. A clean impeller extends the motor’s life and cuts noise to zero.
- Step 6: reassemble in the sacred order, prime the filter with dechlorinated water if it’s a canister to help it start, seal it up, and plug it back in. Done. Your bacteria are alive, happy, and back to work for you.
The bigger picture: build an ecosystem that mostly takes care of itself
The longer you sit and watch your tank, the more you realize this hobby is about way more than keeping a box of water clean with some colorful fish floating in it. You’re becoming the caretaker of a tiny piece of nature living inside your home. The real magic starts when you approach fishkeeping from a place of respect and conservation, working with the natural balance instead of against it.
A high-tech, ultra-powerful filter isn’t a free pass to overstock your tank with 50 huge fish crammed into a small space, or to slack on feeding routines and let leftover food rot on the bottom. The filter is a safety net, a buffer, but the real balance comes down to you, your daily habits, and your respect for the biological processes at play.
Live plants play a huge role in this. They act as a silent second filter, consuming the nitrates and phosphates coming out of the biological stage and turning them into beautiful green leaves and pure oxygen for the fish.
Combine well-tuned mechanical and biological filtration with a healthy, dense plant mass and your tank reaches a level of maturity where algae problems and disease essentially stop showing up. You get to become the observer, enjoying the quiet and calm of an ecosystem in perfect harmony with itself.
Aquarium filtration FAQs
How often should I clean my filter?
There’s no fixed calendar rule, because it depends heavily on your tank’s water volume, the filter type, and how many fish you keep in there. As a rough guideline, sponges in internal and hang-on-back filters usually need a light cleaning every two weeks, since space is limited. Large canister filters, on the other hand, comfortably run two to four months without opening, because their bigger interior handles waste far more efficiently. The foolproof test is watching the outflow: the moment you notice the flow noticeably drop, that’s the unmistakable signal the mechanical sponges are begging for a rinse.
Can I turn the filter off at night so it doesn’t make noise while I sleep?
Hard no. Never do that under any circumstance. The filter runs uninterrupted 24 hours a day, 365 days a year. The beneficial nitrifying bacteria colonizing the biological media need a constant flow of oxygenated water to stay alive and do their job. Shut the pump off overnight and the water inside the canister goes stagnant, oxygen levels crash to zero within a couple of hours, and the bacteria suffocate en masse. Turn the filter back on in the morning and you’re pumping a slug of toxic water full of dead, decomposing bacteria and poisonous compounds straight into your tank, which can kill your fish in the blink of an eye. If the noise bothers you, the real fix is buying a quieter model or soundproofing the stand, never cutting the power.
My water looks cloudy and milky-white. What’s wrong with my filtration?
That cloudy, milky look is the classic sign of a full-blown bacterial bloom. It happens frequently in tanks going through the initial cycle, or in mature systems that took a sudden hit, like a serious overfeeding, an aggressive filter rinse under tap water, or a medication that damaged the beneficial colony. It’s basically a runaway explosion of heterotrophic bacteria suspended in the water column, feasting on excess free organic nutrients. The fix isn’t compulsive daily water changes (that usually makes it worse by feeding the rebound cycle), it’s maximizing oxygenation with surface agitation, cutting fish feeding to the bare minimum for a few days, and letting the filter’s biological system mature and rebalance on its own.
Is it good to run activated carbon permanently in a freshwater filter?
As mentioned earlier, no, it’s not recommended to run activated carbon continuously in a balanced, normal freshwater tank. Activated carbon is an extremely effective chemical media that traps a huge range of dissolved substances through adsorption. The problem with leaving it in permanently is that it doesn’t discriminate between good and bad. It’ll pull out medications and bad smells, but it’ll also strip the essential nutrients, iron chelates, and trace elements your live plants desperately need to grow strong and healthy. On top of that, activated carbon has a limited lifespan and its adsorption capacity is usually spent within three or four weeks. Once saturated, it stops working, and worse, if the water chemistry shifts suddenly, there’s a real risk it’ll release the previously trapped toxins back into the tank all at once. Use it only as a short-term treatment for a few days, then take it out of the loop.
The next move is yours
At the end of the day, the secret to a spectacular tank isn’t buying the most expensive gadget at the store. It’s understanding, with real empathy, the needs of that small living world you decided to look after in your home.
With a bit of consistency, cleaning routines that respect your bacteria, and some daily attention to the small stuff, you’ll keep that clear, bright, healthy water you’re chasing. Your fish will thank you every day with their vitality.
Now I’d love to hear from you, because your experience is genuinely useful to this community we’re building on the blog. What filter are you running right now on your setup? Have you ever fought a serious ammonia spike or cloudy water that drove you completely crazy trying to fix? Got a personal trick for arranging media inside the trays you want to share?
Drop a comment below with your thoughts, questions, or stories. I read them with real enthusiasm and I’ll get back to you fast, so we can keep the conversation going about this wonderful hobby we share. Big hug and happy fishkeeping!